 The Learning Research and Development projects you will find in this page are all going to be open source projects.
These projects are all going to be projects I have develop and freely share with you thanks to those of you who have purchased my products.
Of every dollar spent purchasing my products as of 1 October, 2018, I have set aside twenty-five cents to purchase the hardware to make open source projects to share with you. All my time is donated of course 🙂
Why create IoT stuff to work with your LMS?
Learning is not something that just happens in the browser. An LMS is designed to host content – online content – but learning happens everywhere! Not just in the browser.
These projects will represent learning through action – not content! Content is at least static images or test, actions speak louder and proof of actions simply SCREAM evidence-based-learning when those actions can be recorded to, and reported from an LRS.
You just can’t do any of this with an LMS today! So my goal is to show you how you can do this with an LMS, xAPI and an LRS.
Keep an eye on this page, the number of xAPI and IoT enabled learning experiments will always be growing.
Every experiment I successfully complete will be posted as a project here and will have its full details listed and explained so you can reproduce the my success and even modify it for your specific needs.
For each successful project, I’ll be posting the following:
- The project objective
- The expected results of the project (with a video)
- A complete list of hardware (with pictures and links for each item) used in the project
- Step-by-step hardware assembly / connection / wiring instructions
- The code used in the project
- How to test it all to achieve the expected results
My ultimate common goal for these projects will be to report meaningful experiential information to an LRS.
Later, I’ll work within the LearningLocker LRS to analyse the information and make sense of the data through statistical reporting. I’ll then provide you with the setting I use to recreate these reports.
I hope, first and foremost, that we all have fun with this venture.
Happy Holidays!
Record who has attended your class – anywhere!
This project will record students swiping into class. The device we’ll build does not need to be plugged in, so it’s portable. This device needs to be authenticated in a WiFi network.
NOTE: If you plan to hold class outside somewhere – like in a park, you can also use your cell phone as a Wifi Hotspot and have the card reader use it to send attendance records through it.
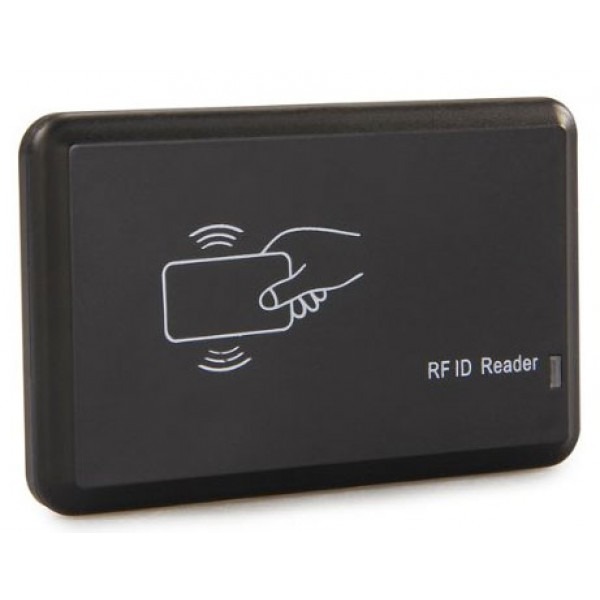
Using PICC swipe cards or NTAG key fobs, students can swipe to register into a class. It then authenticates and sends an “attended” statement to your LRS located on the internet (outside the local area network).
In later projects, I’ll connect this device to a door lock and green and red LEDs for those of you seeking physical classroom attendance solutions.
What you will need to set this up
You can power this setup from a 9 volt battery and it should last about 2 years before the battery needs to be changed. I have not documented this in the layout diagram above.
Hardware required per RFID card reader unit:
- 1 x Arduino YUN WiFi Rev 2 board (about $35.00 CAD)
- 1 x MFRC-522 RFID module (about $3.50 CAD)
- 7 x pieces of electronics grade wire (I recommend 7 colors about 6 inches long each)
- 1 x 9 volt battery connector (typically supplied with the Arduino YUN Wifi Rev 2 board)
- 1 x USB to USB micro cable (used to only load the software into the Arduino YUN – after the first software load, the Arduino YUN can be updated over WiFi and typically supplied with the Arduino YUN board).
- 1 x Case to put it in (although you can use anything to put this into, some low cost cases can be purchased from your local hardware store. I recommend getting a case that is also waterproof because you never know where class will take place 🙂
- I’ll be providing the STL file into this post to print your own case if you have a 3D Printer.
You need to install the free Arduino IDE on your computer and have one USB port available to initially load the software to the Arduino YUN.
To start this project, here is what I did…
I created a sub-domain in my Learning Templates Domain name host.
- I added a new DNS “A” record that contained the sub-domain name and the IP address of my home router.
- I then added a Port Forward in my router at home to this Arduino YUN board so I could access this card reader from the public internet.
- I then created a lesson in my LMS so the instructor could see a table of who has “swiped-in” their attendance for the class.
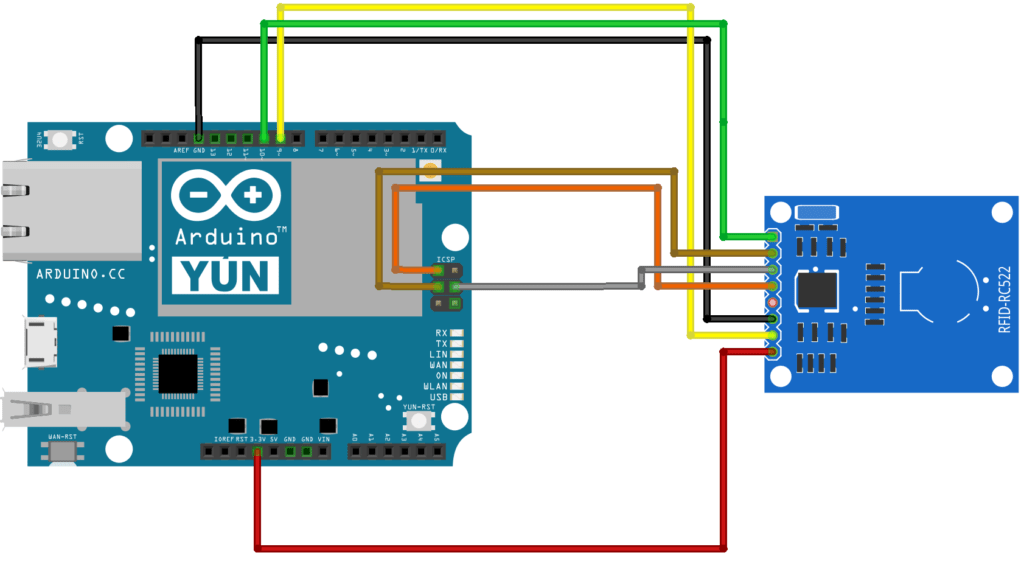
The diagram above depicts the wiring diagram to connect a RC-522 RFID module directly to an Arduino YUN. It works perfectly! I will attach the Arduino .ino file to this post when ready.
UPDATE: I have developed a second version of this IoT project that lets you use 2 RFID modules hanging off the YUN so it can accept multiple swipes simultaneously.
Below, is the rfid-xapi.ino file content for you to copy, modify and use to make this IoT project.
NOTE: This IoT project and it’s code are provided without warranty or support. As with any project I provide in this area of my website, you are on your own to build it. It is not a product I sell and is completely up to you to develop the skills and knowledge on how to implement this IoT project for your purpose.
/*
 * Send xAPI statements to an LRS when a users card is swiped
 */
#include <WiFi.h>
#include <WiFiClient.h>
#include <WiFiServer.h>
#include <WiFiUdp.h>

#include <SPI.h>
#include <MFRC522.h>

#define SS_PIN 10
#define RST_PIN 9
MFRC522 mfrc522(SS_PIN, RST_PIN); // Create MFRC522 instance.

String new_card = String(""); // Used for Card UID
String scan_actor = "";       // Used for the actor in the xAPI statement
String scan_verb = "";        // Used to build the verb for the xAPI statement
String scan_obj = "";         // Used for the object in the xAPI statement
String scan_stmt = "";        // xAPI statement to be sent
String result = "";           // The resulting statement ID, or error, from the LRS

WiFiClient lrs; // Create TCP connection to Learning Record Store
byte server[] = {123, 123, 123, 123}; // LRS IP address

void setup() {
  Serial.begin(9600);      // Initiate a serial communication
  SPI.begin();             // Initiate  SPI bus
  mfrc522.PCD_Init();      // Initiate MFRC522
  Serial.println("Place your card or key-fob close to the reader...");
  Serial.println();
  pinMode(13, OUTPUT);     // Set Pin13 as output
  digitalWrite(13, HIGH);  // Set Pin13 High
}

void loop() {
  // Look for new cards
  if ( ! mfrc522.PICC_IsNewCardPresent()) {
    return;
  }
  // Select one of the cards
  if ( ! mfrc522.PICC_ReadCardSerial()) {
    return;
  }
    new_card = String("");
    result = String("");
    // This loop will build the new_card string with the UID of the MiFare card
    for (byte i = 0; i < mfrc522.uid.size; i++) {
        new_card.concat(mfrc522.uid.uidByte[i] < 0x10 ? "0" : "");
        new_card.concat(String(char(mfrc522.uid.uidByte[i]),HEX));
    }

    // Build the xAPI statement
    // Object will be built using card UID
        scan_obj = ""object":{"id":"http://omnesnet.com/cards/";
        scan_obj += new_card.toUpperCase();
        scan_obj += "","definition":{"name":{"en-US":"";
        scan_obj += new_card.toUpperCase();
        scan_obj += ""},"description":{"en-US":"";
        scan_obj += new_card.toUpperCase();
        scan_obj += ""}},"objectType":"Activity"}";
        Serial.println(scan_obj);

        // Verb is "scanned"
        scan_verb = ""verb":  {"id":"http://activitystrea.ms/schema/1.0/event","display":{"en-US": "attended"}}";
        Serial.println(scan_verb);

        // Actor is the door at which the card was scanned
        scan_actor = ""actor":{"mbox":"mailto:card_reader@domain.com","objectType":"Agent"}";
        Serial.println(scan_actor);

        // Put the parts together into the statement
        // There is no timestamp since the LRS should apply one anyhow.
        scan_stmt = "{";
        scan_stmt += scan_actor;
        scan_stmt += ",";
        scan_stmt += scan_verb;
        scan_stmt += ",";
        scan_stmt += scan_obj;
        scan_stmt += "}";
        Serial.println(scan_stmt);
        Serial.println(scan_stmt.length());
        Serial.println("connecting...");
        if (lrs.connect(server, 443)) {  // Open the connection to the server
            Serial.println("connected");
            lrs.println("POST /data/xAPI/statements HTTP/1.1");
            lrs.println("Host: 64.140.158.249"); // you must send the server address as part of the POST
            lrs.println("Content-Type: text/xml");
            lrs.println("X-Experience-API-Version: 1.0.1"); // set the version of xAPI used
            lrs.println("Authorization: %%% Basic This will be your base64encoded LRS username and password %%%"); // you need to encode the username and password yourself
            lrs.println("Cache-Control: no-cache");
            lrs.print("Content-Length: ");
            lrs.println(scan_stmt.length());  // Character count of the payload.  In this case, just the xAPI statement.
                                              // You must send this so the system knows how much data to expect in the statement.
                                              // You must add this manually!
            lrs.println();
            lrs.println(scan_stmt); // Send the statement built above
            Serial.println("Statment sent");
            delay (12000);  // wait until the LRS has time to process the request. On a raspberry pi Zero, this is about 12 seconds or so.
            while (lrs.available()) {  // collect the result, which should only be the statement ID
                char c = lrs.read();
                Serial.print(c);  // print out the statement ID/errors for diagnostics.
            }
            Serial.println();
            lrs.stop(); // close down the communication with the server.
            // Send query to see if this card is allowed. It doesn't matter if the card HAD been approved in the past.
            // We want to know what the last statement said.  So we'll send the following parameters:
            // Agent: admin@domain.com
            // activity: https://domain.com/card/new_card.toUpperCase() - search for THAT card
            // limit 1 - only show the last statement to meet the above
           if (lrs.connect(server, 443)) {  // Open the connection to the server
                Serial.println("connected");
                lrs.print("GET /data/xAPI/statements?format=exact&agent=%7B%22mbox%22%3A%22mailto%3Aname%email.com%22%7D&limit=1&activity=http://domain.com/courses/lms-course-slug/");
                lrs.print(new_card.toUpperCase());
                lrs.println(" HTTP/1.1");  //these three lines build the actual query, including the card ID
                lrs.println("Host: 123.123.123.123"); // you must send the server address as part of the GET
                lrs.println("SOAPaction: xyz");
                lrs.println("Content-Type: text/xml");
                lrs.println("X-Experience-API-Version: 1.0.1"); // specify what version of xAPI is being used
                lrs.println("Authorization: Basic %%% Your bese64encoded LRS username an dpassword willreplace this %%%"); // you need to encrypt the password yourself
                lrs.println("Cache-Control: no-cache");
                lrs.println(); // again with the blank line to close out the GET
                Serial.println("Query Sent");
                delay(5000); // delay 5 seconds so the LRS has time to run the query and respond in full
                while (lrs.available()) { // listen for the resulting statement
                    char c = lrs.read();
                    result += c; // build the string Result with the statement and header information
                    Serial.print(c);
                }
                Serial.println();
            lrs.stop(); // Close down the communication with the server
            }
        }
        else { // If you couldn't open communication with the server, show an error
            Serial.println("connection failed");
        }
        // Look at the resulting statement from the query.
        // If the statement contains the word "approved"
        // then let the card through.  If not, denied.
    if (result.indexOf("approved") > 0 ){
        Serial.print("Found it: ");
        Serial.println(result.indexOf("approved"));
        delay(5000); // give the person five seconds to notice the light/result
    }
    else {
        Serial.println("DENIED!!");
        delay(5000); // give the person five seconds to notice the light/result
    }
    //put a border on it to separate the results
  Serial.println("=======================================");
  Serial.println();
  Serial.println();
} // End loop
If you wish to create the box this project is contained in and have a 3D Printer available, I can provide the STL file for you, else if you need the containing box provided, please contact me via my Contact Us page to arrange the printing and delivery of the box.